Showing posts with label betch. Show all posts

Thursday, February 26, 2015

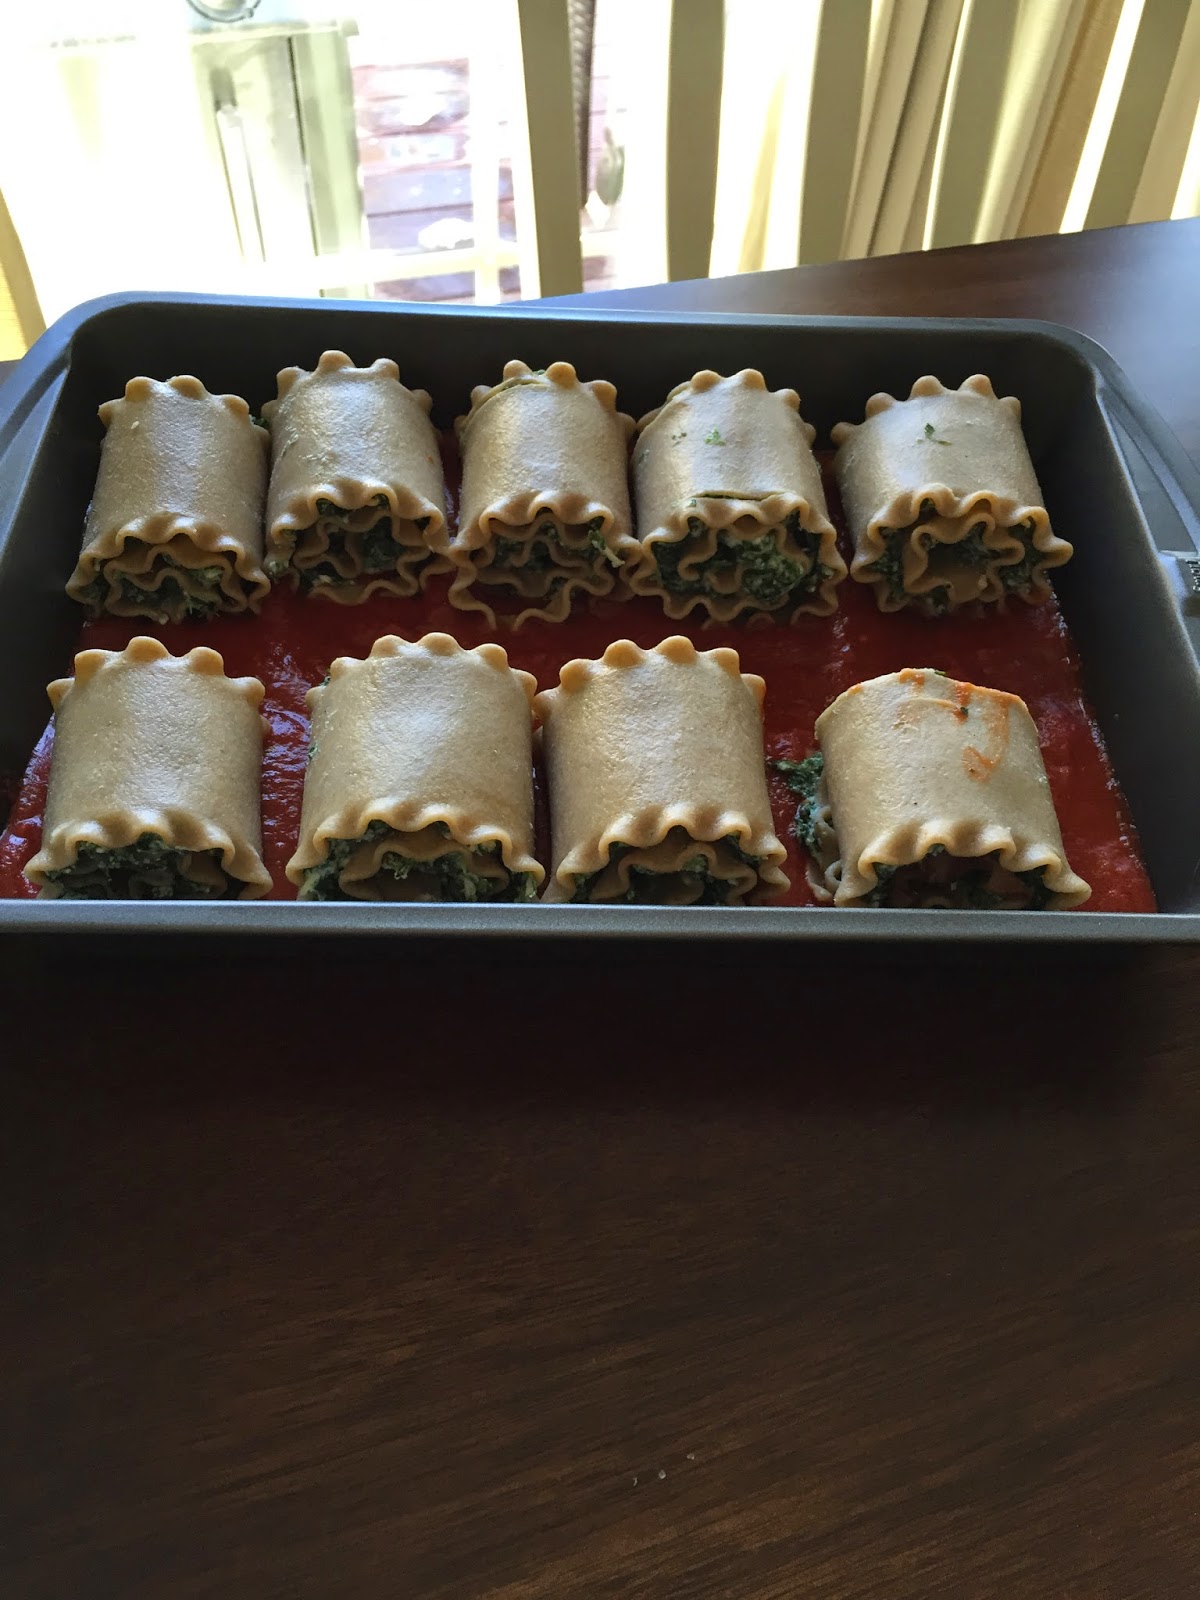
Skinnylicious Lasagna Roll Ups

Oh hey everyone! Don't worry I didn't forget about you! There has been SO MUCH going on. All good things, of course. I have an exciting announcement (not food or blog related) that I will be able to share tomorrow! As most of you know, I have been busy planning a wedding and training to be a future house betch. In addition to planning a wedding I thought it would be a fantastical idea to get certified to be a personal trainer. I'm really enjoying it, but JEEZ it is a lot of work. But like I said, this is all part of my plan to not only be a House Betch, but to be a SUCCESSFUL BALLER House Betch.

Anyway, I've been trying to eat healthy since I am at the less than two month countdown for the wedding and I had my dress fitting a couple of weeks ago. So to help curb my crazy cravings of chiptole or anything else unnecessary during lunch, I made a yummy vegetarian dish. I came up with a super original name...Skinnylicious Lasagna Roll Ups. I'm amazing. I know. Please everyone, hold your applause. Here goes the recipe!


Skinnylicious Lasgna Roll Ups

What you will need:
8-10 Whole Wheat Lasagna Noodles
10 oz (or whatever size) bag of Frozen Spinach (thawed)
15 oz part-skin ricotta cheese
1/2 cup grated Parmesan cheese
1 egg
1/4 tsp Italian seasoning
1/8 tsp salt
1/8 tsp black pepper
24 oz jar of Italian Pasta sauce
1/2 cup low moisture, part-skim, shredded mozzarella cheese


Instructions:
  1. Preheat your oven to 350 degrees. While that is preheating begin boiling a pot of water for your lasagna noodles. I recommend using a larger pot since they are long. 
  2. Begin defrosting your Spinach, or if you are a proactive patty take it out earlier in the day and let it defrost in the sink. After the spinach is defrosted, use a strainer to get rid of all the excess water and place into a medium sized bowl
  3. Once the water is boiling, cook your lasagna noodles until they are al dente. I recommend putting them in 3 at a time because as I said they are long and thick so they don't soften as easy as regular noodles. I would keep them in boiling water for about 12 minutes. You want them to be al dente, not soggy.
  4. After the lasagna noodles are cooked, lay them on wax paper and carefully pat them dry.
  5.  Moving back to the spinach in the medium sized bowl, add your ricotta, Parmesan cheese, egg, salt, pepper, and Italian seasoning. Mix well until everything is combined!
  6. In a 10 x 7 inch baking dish, pour in half of your pasta sauce to coat the bottom.
  7. Returning back to the lasagna noodles, I recommend keeping a paper towel handy as this can get messy. Spread about 1/4 a cup of the spinach mixture evenly over each noodle. CAREFULLY roll the noodles and place them seam side down in the baking dish.
  8. Repeat step 7 until you run out of mixture or noodles. 
  9. Once all of the noodles are rolled up, pour the remaining sauce over the noodles. The sauce helps to keep the noodles hydrated during the baking process. Top each roll up with a pinch of Mozzarella cheese.
  10. Cover the top of the baking dish with foil and back for 40 minutes.

Serve right away or put in the refrigerator for a yummy lunch throughout the week! 

Also, for all of you calorie counters out there, each roll up comes out to approx 200 calories. And coming from a girl with a bottomless pit for a stomach, one roll for lunch will leave you very satisfied! Not full but definitely not hungry!

Monday, January 26, 2015

Honey Chicken

Do you ever get into things thinking, wow this is a great idea then quickly realizing you are freaking crazy? Well, hopefully i'm not alone on this, but I am at that point. I'm getting married in April so I am in pretty deep with wedding planning, I started this blog, and I also signed up for a Personal Training Certification class. I had been thinking about doing this for a while and the second 2015 hit, I figured, there is no better time than now! Right, well I must have drank 4 or 5 glasses of wine when I made that decision. It is A LOT of work, and doing it while wedding planning, and working, and living...OY I'm breaking a sweat just thinking about it. But hey! I'll be happy when I reach my goal! Speaking of, any local FLIPADELPHIANS wanna get in shape? Lemme know, I'd love to train you!

My time is so precious that I haven't even had the time to get a Mani and Pedi. My dogs are in need of a pedi, and my engagement ring has been crying every time I try and put it on in the morning. It says, "hell you think I'm going on that finger without fresh polish and those heinous cuticles...you gotta be kidding me!" Also, being this busy has caused me to think that my engagement ring is talking to me. UGH!

Anyway, enough complaining. This house betch is so excited for all that 2015 has to offer. Life is so precious. It is important to take advantage and live out every moment. So that is exactly what I'm doing. 

OK enough with the deep thinking and words of wisdom, do you want some dinner? DUH! My family surprised me during my bridal shower back in October with an amazing cook book that has all of my family and friends favorite recipes. One of my main motivations for starting this blog was to share some of these amazing recipes (not the secret ones). My past Jewish Great Grandparents would roll over in their grave if I gave away that brisket recipe! One of the recipes in the book is Honey Chicken. This was given to me by my wonder future mother in law, Marci! It is such an easy week night dinner. Perfect for people who are going crazy with a million things to do. I can even imagine what it's going to be like with Kids running around my house...House betch goals.


Honey Chicken

What you'll need:
Boneless/Skinless Chicken Breasts (however many you want to cook. This can be for one person or a whole family!)
Paprika
Garlic Powder
Honey
Pepper and Salt
Olive Oil
*Optional: Crushed Red Pepper*

Instructions:
  1. Preheat your oven to 350 degrees
  2. Take your chicken out and place the breasts on a cutting board. Cover them in saran wrap. Get out a mallet and begin pounding your chicken. Really take your stress and frustration from your day out on these babies. This will ensure that your chicken cooks evenly and you don't have to keep throwing it back in the oven for raw pieces.
  3. Place your chicken breast in a Pyrex dish or any over safe/non-stick dish.
  4. Drizzle Olive Oil over your chicken and season with a pinch or two of salt and a pinch or two of pepper
  5. Take your garlic powder and shake it over your chicken. I guess it equates to about a tablespoon, maybe less of garlic powder.
  6. Take your paprika and just go to town on that chicken. Don't be shy! Make sure your chicken is basically red, covered in paprika.
  7. Next comes the honey. Squeeze the honey over your chicken. Again, however much you want.
  8. Now, flip your chicken over in the dish and repeat steps 4-7.
  9. If you want to add a little spice, take some crushed red pepper flakes and sprinkle a few over the chicken.
  10. Place the chicken in the oven for 35-40ish minutes.
This is an easy weeknight dinner that you can throw together rather quickly, put in the oven and multitask with the million other things you've got going on in your life, while it cooks! Enjoy with some kind of rice, asparagus, green beans or steamed broccoli. Simplicity is key!

Wednesday, January 14, 2015

Healthy Chicken Salad

Yes, you read that right. HEALTHY. CHICKEN. SALAD. I know what you are thinking, "I can't eat chicken salad without the globs of mayo appearing on my ass and thighs." Well unfortunately, with this chicken salad, I can't make any promises, but it's mayo-less, so that is a start.

As I'm sure you are well aware, we are all going through this crazy flu season right now. But not this girl. Thank goodness corporate america gives us those free flu vaccines in the fall so we don't get sick and ever miss work. *remind me to make out with a flu infested person so I can have an excuse to lay in bed and binge watch the walking dead.* But really, do you ever think about it? The fact your company gives you those free flu shots is so you don't get sick and miss work. What if I'm trying to get a little under the weather and snuggle with my dogs all day? But truthfully, I am very thankful, because I don't want that! Maybe just a stomach virus so I can get to my goal weight for the wedding. JK...kinda. But anyway, back to the purpose of this post, before my internal dialogue went all nuts...With it being flu season and unbearably cold, now is a great time to make soup! Specifically chicken soup. Do you know what the best part of chicken soup is? THE SOUP CHICKEN! I know, everyone, please contain your excitement. There is SO much you can do with soup chicken.

In comes the next character I'd like to introduce you to in my life story, he is pretty important and sexy, my future hubby, Scott. We will refer to him as Mr. Wonderful (he picked his own nickname). I would have preferred Chicken Man, but whatever. (here is a picture of my chicken man, I mean, Mr. Wonderful)

He was annoyed because I kept making him pose to take pictures while he was sleeping. GOSH I'M SO ANNOYING!

RELATIONSHIP ADVICE #1: Pick and choose your battles.

Mr. Wonderful has this amazing recipe for chicken soup, but sadly, he isn't ready to reveal his genius to you yet as he is still fine tuning. I told him I expect nothing but perfection for this House Betch In Training Blog so I have him locked in the basement perfecting the recipe. Just kidding. Not really. Or am I??? ANYWHO, last week we had chicken soup for dinner and I decided I wanted to make chicken salad with the left over soup chicken that wasn't being used to go in the soup. Here goes:


Shopping List:
Non-fat plain Greek Yogurt (whatever brand you want)
Apple - green or red
Grapes
Slivered Almonds
Salt and Pepper
Rye Bread - if you want to make a sammy

Directions:
I basically eye ball this recipe and leave this up to your own discretion.  It all depends on how you like your chicken salad.

  1. Take your shredded chicken and put it in a mixing bowl (however much you want to eat) I use about a handful, plus a little more because I have infant hands.
  2. Using a big spoon, spoon out some of the greek yogurt into the mixing bowl with the chicken. Mix it around until the chicken is coated. Keep adding more chicken or more greek yogurt depending on how you like your chicken salad.
  3. Slice up some apple slivers into smaller chopped pieces and cut your grapes in half. Again, use your judgement of however much you want to use. I use my apple slicer and end up using about 1 1/2 spears and about a handful of grapes.
  4. After you have chopped your apple and cut your grapes in half, combine it with the chicken and yogurt mixture. Make sure everything is evenly coated.
  5. Add some slivered almonds to your liking.
  6. Add salt and pepper to taste.
  7. Mix it all together! and BABAM! CHICKEN SALAD!
Really simple! I also recommend making this ahead of time and letting it sit in the refrigerator for some time to soak up all the yummy ingredients. Toast some rye bread, put it in a whole wheat wrap, or just eat it with a fork! ENJOY your non-cellulite inducing chicken salad!

Wednesday, January 7, 2015

Vitamix = LIFE

Hello to all my party people. I am about to whisper the secret of house betch success in your ear. Are you ready for it???


GET A VITAMIX

GET A VITAMIX

GET A VITAMIX

GET A VITAMIX


You will be thanking your betchy gods, me, for telling you this now. Your life will never be the same. You will be able to blend soups, smoothies, sauces, (I'm running out of "S" words) hummus, ANYTHING! You can even pulse your ground beef for all I care. Your life will be changed.

Now for all of you that don't know, I'm getting married in April - GAHHHHHH! So excited! And if you don't know, now you know. If there are any brides out there, or grooms, you MUST and I mean MUST put this on your registry. Like if you are reading this and are at this point of the post and haven't logged into your Bed Bath and Beyond or Williams Sonoma registry yet, you are truly missing out. SO DO IT! Here, I'll make it easy, here are the sites:

http://www.bedbathandbeyond.com/store/page/Registry

http://www.williams-sonoma.com/pages/registry-landing-page.html?cm_type=gnav

If you want my honest opinion, you should really get it from BBB. They always have coupons, deals, and as I mentioned in a post before, take back ANYTHING. Even without the box. So if it breaks or you just want to upgrade, you can take it back there! You can also register yours online and I believe it is covered for life. Like FOR-EV-ERRRR.


Whenever I have the time and feel like going to work and putting on pants and I'm not eating Muesili for breakfast, I mix up a green smoothie. Check out Pinterest. Specifically, my board that has anything and everything you need for a Vitamix original green smoothie: http://www.pinterest.com/lindsaysgordon/vitamixin/

To build off of my greek feast post yesterday, here is a recipe for some homemade Roasted Red Pepper Hummus.

Shopping List:
2 cloves of garlic
1 (15 oz) can of garbanzo beans aka chickpeas, drained
1/3 cup of tahini (this can be found in the Mediterranean aisle)
1/3 cup of lemon juice
1/2 cup of roasted red peppers
1/4 tsp dried basil
taste it and add some salt as you wish

In your vitamix, combine your garlic, garbanzo beans, tahini and lemon juice. Process this until the mixture is smooth. Then add in your roasted red pepper, basil, and salt (as needed). Process this until the peppers are finely chopped and you will get a nice light red color. Season with salt and pepper. Transfer your hummus to a small bowl and chill until you are ready to use.

I served mine with Naan, whole wheat pita and veggies!

Enjoy this easy recipe! And most importantly, GO OUT AND BY THAT VITAMIX, NOW, BETCH!


Monday, December 29, 2014

Nutella French Toast Bake

Attention world, what I am about to throw at your is not for the weak-hearted. YOU HAVE BEEN WARNED!

Many of you that are probably reading this, woke up on Christmas morning to a beautiful tree decorated with lights, memorable ornaments and an INSANE amount of presents resting underneath of it. Well, my holiday ended just the day before. I had 8 crazy nights of presents! TAKE THAT CHRISTMAS! But I'm sure ALL of you are wondering, what do Jewish people do on Christmas? It is exactly what you hear and think. We eat Chinese food and go to the movies. It's the only thing open! Also, we speed on all of the roads while you guys are busy doing your Christmas thing. That is what we do most years but this year was a little different. You see, my Mother's birthday falls on Christmas. When people find that out, they normally say the same thing, "UGH, you poor thing! You probably were so disappointed on Christmas morning! You probably get gypped, that totally sucks!" But the response my mother normally gives is, well I'm Jewish and don't celebrate Christmas so I don't have that problem. MUAHAHA. So this year, for my Mother's 50th birthday we threw her a birthday brunch where all of our fellow jewish friends, who had nothing to do on Christmas morning, came over to eat bagels, shmear, kugel, you name the jewish food, it was at my parents house. I wanted to experiment with a french toast recipe so I offered to make some and bring it for the party. French toast is a breakfast staple for every House Betch's offspring. Kids eat that shit up...especially with powdered sugar and maple syrup.

I was making french toast for 20-30 people so I had to make this recipe pretty large. This is great for brunch parties and even as a dessert! You can even make this for one person as a sandwich on the stove. It is a very adaptable recipe. The key component is...wait for it...NUTELLA! Its gooey hazelnut goodness sends us basic white betches to this euphoric place every time we eat it. Don't ask, just pass the Nutella, OK!?!


This is what you will need:

Serves 12-15
  • 2 loafs of Challah (depending on your dish, you will probably only use about 1 and a half loafs)
  • 10 eggs
  • 1/2 cup of Whole Milk
  • 3/4 cup of half and half
  • 2 Tbsp of Pure Vanilla Extract
  • 1 1/2 cup of brown Sugar
  • Pinch of salt
  • Stick of Butter
  • 8 heaping Tbsp of Nutella
  • 1 tsp of Cinnamon 
  • 9 x 13 baking pan/dish - or whatever size you want - but it should be big
Directions:
  1. Melt the butter in the microwave and combine it with the brown sugar. Take half of that mixture and pour it on the bottom of the pan/dish. Be sure to spread it all around.
  2. Cut your challah about 1/2 - 3/4 inches thick
  3. Arrange 1/2 of your slices of challah in the dish. It's OK if it overlaps
  4. Spread Nutella over the slices of bread - as much or as little as you want
  5. Place the remaining slices of challah over the Nutella
  6. Cover the top of the challah slices with the remainder of the brown sugar and butter mixture
  7. In a large mixing bowl whisk together your eggs, whole milk, half and half, vanilla, cinnamon and salt
  8. Once it's all mixed together, pour over the entire bake. Make sure you get in some of the little crevices so the bottom is able to soak in. Don't feel that you have to use all of this mixture. It will be sitting over night, so use what you feel is right
  9. Cover the dish with plastic wrap and put it in the refrigerator for 3 - 12 hours. I let mine sit and soak overnight
  10. After it finishes soaking/you wake up the next morning, preheat your oven to 350 degrees. While the oven is heating up, take your french toast out of the fridge and let it sit at room temperature for 20 minutes
  11. bake your french toast until it is golden brown and set for approximately 30-45 minutes. Just keep an eye on it to see that it is getting golden on top. I then transported it over to my parents house and reheated it for 5 minutes on 350.
Now, this is already EXTREMELY fattening, so if you want to just go for the gold and send your heart into overdrive top with powdered sugar or maple syrup. I'm not that into sweets so I couldn't even think of doing that! 

Here are some pictures!

 
This is the egg mixture
The beauty of Nutella on Challah - This is the first layer


The top of the bake before putting the egg mixture on top. TRY everything in your power to not skim your finger along the top of the french toast to taste that butter and brown sugar mixture...you will end up just eating this entire thing raw. SO GOOD!
Goodnight my lovely french toast bake. I shall see you in the morning!
The finished product! Good morning my beautiful breakfast. You will put so many dimples in my ass, but I will love you regardless!
A piece of the french toast. I have to keep my girlish figure, so could only take a little sliver! The entire bake went!
The best part about this entire french toast experience? My lovely Jewish Grandmother said this was the most DIVINE thing she has ever eaten. There were a couple of moans coming out of peoples mouths as they took a bite...I'd say that this was an awkward success! 

Monday, December 22, 2014

About Moi

Hi Everyone. Lindsay, here! I hope you enjoy my ramblings about life, food and becoming a house betch. I'm "in-training" so anything I say should not be taken seriously. Who am I kidding, EVERYTHING I say should be taken seriously! I'm self diagnosed with ADHD so you will find a multitude of topics on here. Basically everything I love. Food. Cheese. Workouts. All things pumpkin (What do you expect? I'm a basic white betch?). Dogs. My dogs of course. Mostly just pictures of dogs that make you want to squeeze their bellies and kiss their big wet noses.

Anyway, thanks for stopping by!